
Water Softener Upgrade
As we started our Full-Time RV lives, we started noticing folks at the campgrounds setting up water softeners next to their buses. I asked lots of questions and did lots of googling and saw the value of adding a water softener system to our coach so that we would (1) protect our appliances from hard water related issues, (2) Help cut down on the spots and cleaning headaches associated with hard water, and (most importantly) (3) make the water quality much better for Tonya who has skin that is sensitive to hard water.
As I started doing research, I came up with a few requirements:
- I wanted a ~ 15,000 grain system to handle our normal water usage
- The water softener system had to be installed in the basement of the coach
- The water softener system had to be plumbed into the coach
- The water softener system did not need to be removed to backwash or regenerate
Based on those requirements, I went looking to figure out where was the best place to put it in the basement. I did not want to lose any of our main storage space (as that is a premium for us full-timers) and decided the best place to put the water softener system was in the bay in front of the tag axles that Newmar installs the peg board and black metal shelves on the Dutch Stars (and other models).
I removed the tray and the pegboard and found I had a little over 7″ of depth to work with. Next step was to find the right Water Softener for my installation.
SoftCell
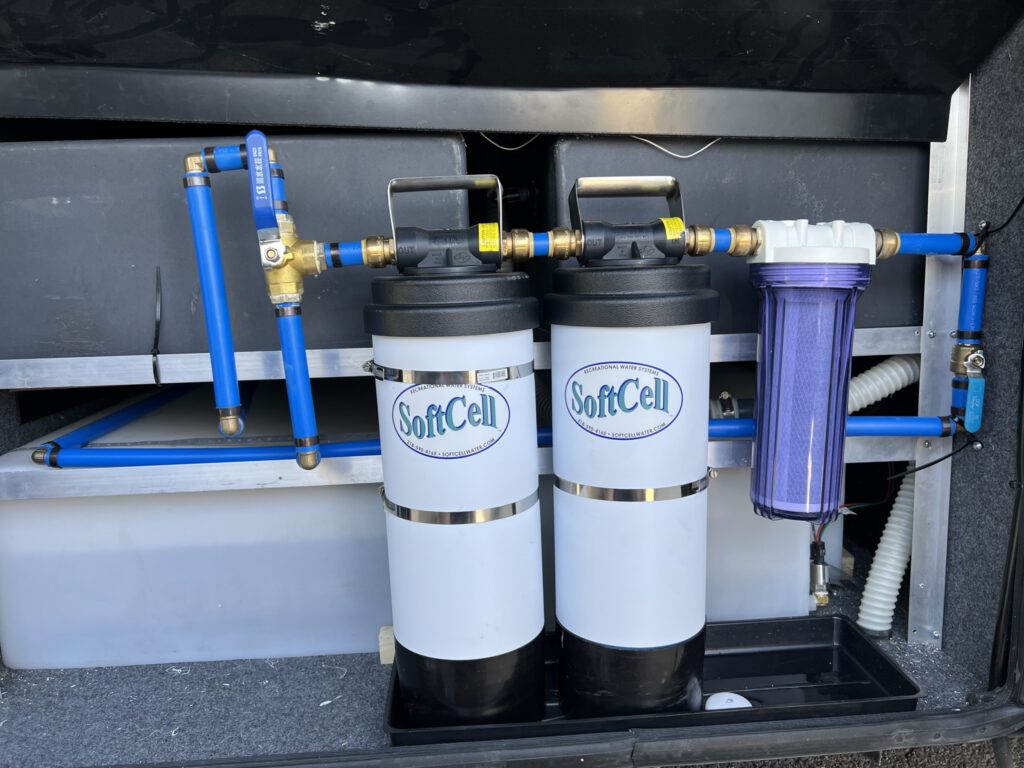
I looked at several brands of water softeners that were built for RVs and Boats, but one brand seemed to stand out as having many of the characteristics I was looking for. The SoftCell system was designed so that you did not have to take the top off and dump it out as part of cleaning or regeneration. It was designed with an attached water filter so that you could simply connect hoses up to use the unit with the filter in-line, reverse the flow to backwash, and just use the filter as a salt brine mixing container (inverted) to regenerate. The only issue I had was the size of the 15,000 grain unit was too big to fit in the 7″ space I wanted to use…
The solution turned out to be fairly easy. I called up SoftCell and got to work with Jim (the owner). He suggested I use two of their 7500 grain “Slim” models in serial to achieve the 15000 grain system that I wanted. Not only did he provide a great suggestion, he was heading to the Tampa RV show and would bring my two units and filter down with him so I could save on shipping!!! Jim was also great in planning out the installation, providing pointers, and has been fantastic to work with.
I highly recommend you call Jim and let him know you are planning on doing an implementation like the MostTimers! He will make sure you get all the right parts and will set you up with just what you need! (make sure you mention MostTimers when you talk to him!!!)
Water Softener Bay
For the installation, I found a drip tray on Amazon that looked to be the perfect size to put under the SoftCell System. I repurposed the aluminum supports that were used to hold the pegboard in place and built a frame that I could attach the SoftCell units to with large stainless steel adjustable clamps. I fit everything in place cut Pex pipe to length, and ran long lines above the fresh water tank over to the wet bay. I made sure to attach the pex pipe to the side wall to help support the Water Filter.
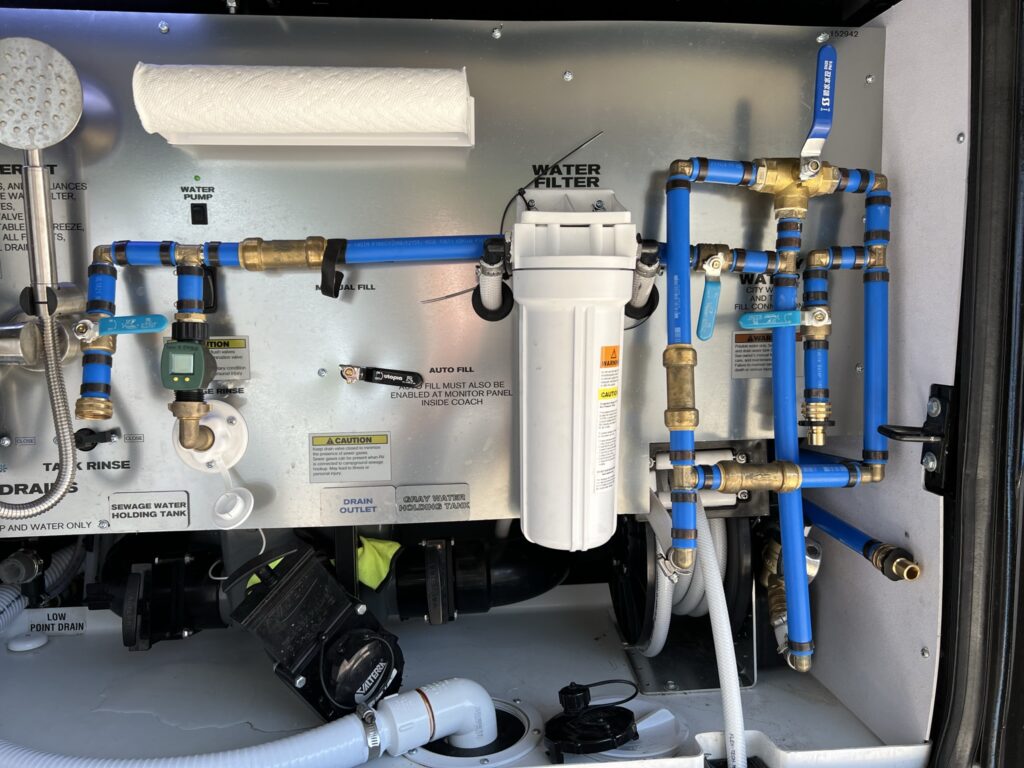
Wet Bay
On the wet bay side of things, I wanted to take the opportunity to do a couple of other upgrades while I was working in there. I had previously had Newmar install a water pressure regulator in the bay, so that was already in place. I did want to setup the system so that I could do the following:
- Be able to flush the black tank using the single hose connection to the campground water line (safely)
- Be able to still use a separate hose connection at a dump station to flush the black tank
- Be able to easily bypass the SoftCell system in case I needed to do some maintenance
- Be able to easily hook up connections to be able to backwash the SoftCell system as well as to regenerate the system
The biggest challenge was installing all the valve controls, check valves, etc. in the limited space I had in the wet bay. Lots of planning and measuring, cutting, crimping, undoing, recutting, re-crimping (again and again) I ended up with what I feel is a pretty decent setup!
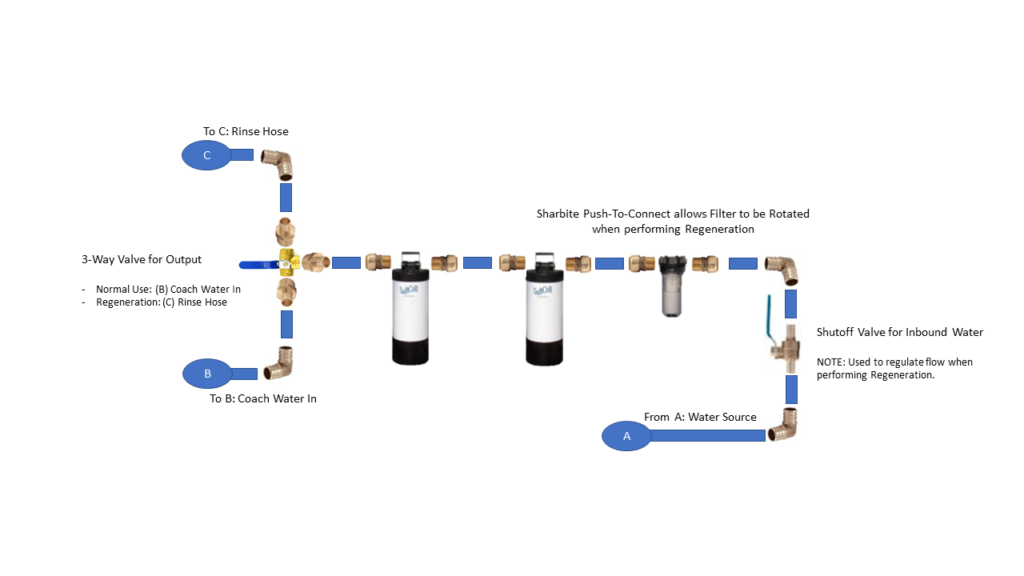
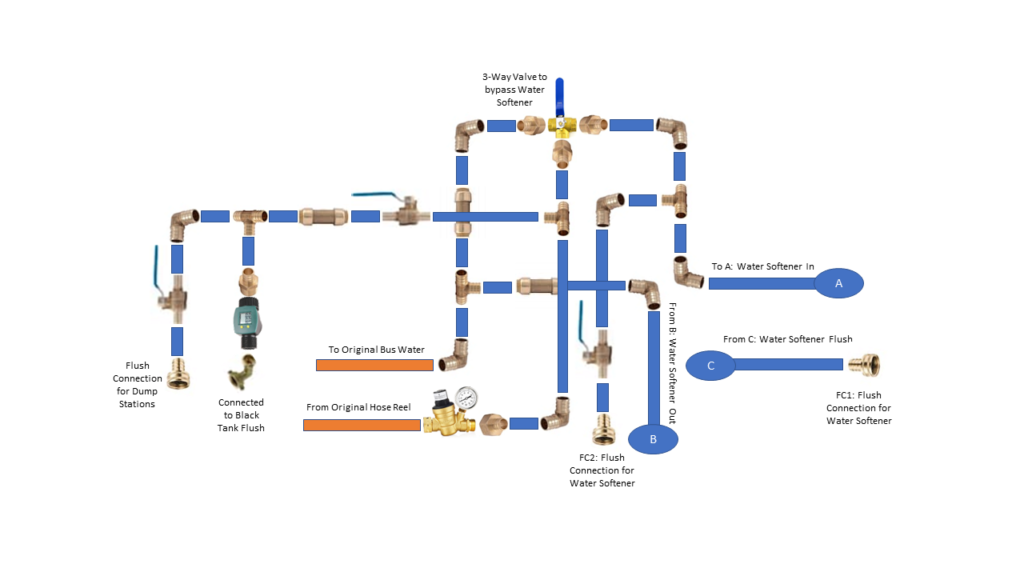
Diagrams and Parts List
Plumbing Diagram for the Water Softener Bay
Plumbing Diagram for the Wet Bay
Parts List


